Are you tired of straining your neck and relying solely on your mirrors to navigate your vehicle? Installing a wired backup camera system can greatly improve your visibility and make maneuvering your vehicle a breeze. In this blog post, we will guide you through the step-by-step process of installing a wired backup camera system on your vehicle.
- Installation is relatively quick and easy provided you know a little about cars and power tools.
Basic knowledge on the workings of your car and the operation of a drill is all you need to install a backup camera on the your vehicle.
You need to plan properly ahead, in order to allow the wire to pass through you need to depend on where you decide to install the camera and the monitor to drill holes through the car’s body.
To install a wired backup camera system, follow these step-by-step instructions:
Step 1: Plan Your Layout
1. Monitor Placement: Choose a location on the dashboard or windshield that provides a clear view without obstructing driving sightlines.
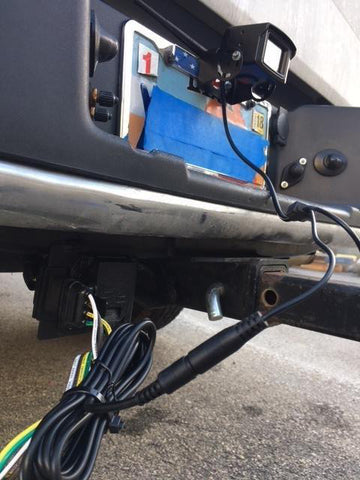
2. Camera Placement: Common spots are above the license plate or integrated into the rear tailgate/hatch. Ensure the camera has an unobstructed view rearward.
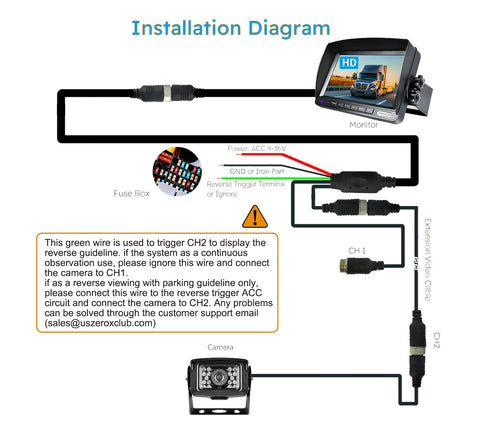
3. Route Planning: Decide the path for running the long RCA video cable from the rear camera to the front monitor. Common routes include:
- Under the vehicle's interior trim (door sills, headliner).
- Along the factory wire harness channels.
- (Less common/advanced) Under the chassis, using protective conduit.
Step 2: Install the Rear Camera & Connect Its Power
1. Mount the Camera: Secure the camera at the chosen rear location using the provided bracket and hardware.
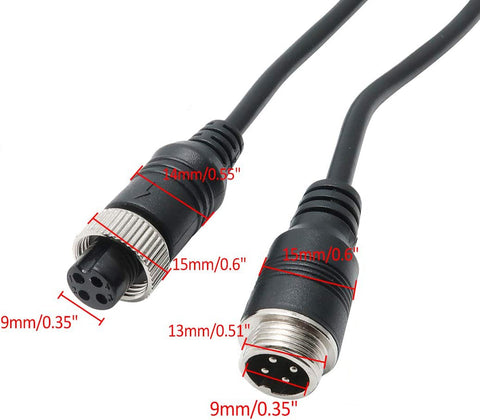
2. Connect the camera's cable to extension video cable, make sure the 4-pin plug pins are aligned to ensure a tight connection.
Step 3: Run the 4-pin Video Cable to the Front
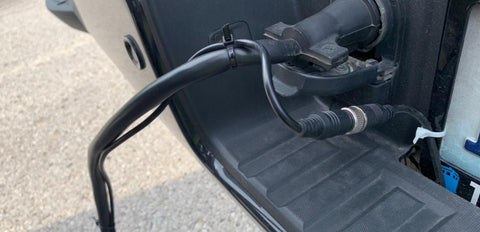
1. Locate a suitable entry point into the cabin. This can be through a rubber grommet in the firewall or an existing hole for other wiring, if not, start by drilling a small hole near the camera location.
2. Feed the camera cable through the entry point and into the cabin. Carefully tuck the cable along your planned route under carpet edges, trim panels, and through existing grommets in the vehicle body. Use trim tools to avoid damage.
Avoid: Sharp edges, hot surfaces (exhaust), and moving parts. Use zip ties and wire loom for protection where needed.
3. Bring the cable's end to the area behind your dashboard where the monitor will be located. Connect the video cable to the the monitor, ensuring a secure connection.
4. Secure any loose sections of the cable with zip ties or cable clamps to keep them neat and prevent interference with other components.
Step 4: Mount the Monitor
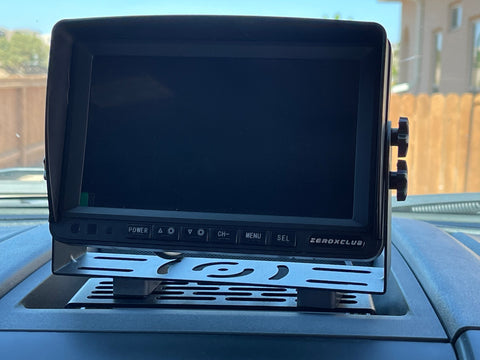
First, you will need to mount the monitor inside your vehicle, considering the driver's line of sight and ease of visibility to decide on the best location for it. Common locations include the dashboard or the rearview mirror. Choose a location that is easily visible to the driver and does not obstruct your view of the road. Use the provided mounting brackets and screws to secure the monitor in place, making sure it is securely attached.
Once mounted, position the monitor to a comfortable viewing angle.
Step 5: Hardwire Power to the Dashboard Monitor
Once the cables are in place, locate the power source for the unit. A separate power source or the fuse box. Connect the colorful power cable to the chosen power source, ensuring a secure and reliable connection.
If you hardwire the camera to the vehicle’s fuse box, you will need to find where the fuse box is located. Here, we recommend you have your vehicle user manual with you so you can ensure you are connecting to the proper fuse, and understand the fuse’s function. If you don’t have your manual, you should be able to find this information online, just ensure to specify the year and make of your vehicle, as some manufacturers will change the functions of fuses.
Note: The vehicle’s fuse box is made to be hidden, so you may need to remove some of your car’s panels, or lift a cover in order to get to it. Common places are under the steering wheel, in the glove box, or in either front footwell.
If your car has multiple fuse boxes, you’ll generally want to pick the fuse box closest to where you’ll be installing your monitor.
The next step is determining which fuse slot to use:
With the engine off and your key out of the ignition, use the circuit tester to find a constant fuse. If the fuse lights up your circuit tester, you’ve got a constant fuse.
Next, you’ll need to find an ignition-switched fuse. A switched fuse will read cold while your engine is off, with no response from the circuit tester. Turn on the ignition of the vehicle, and if the circuit tester lights up, you’ve found your ignition-switched fuse.
Note:Always refer to the vehicle’s owner’s manual to avoid fuse slots that could pertain to certain safety features within your vehicle. Those that some control airbags, stability control programs, the horn and so on are the ones you avoid messing with!
Note: Do not leave the ignition of the vehicle on when not testing.
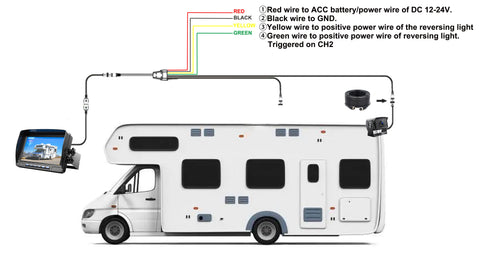
Once you’ve got the fuse slots figured out, it’s time to connect the wires. There's a red cable for ACC, yellow for 12V+, black for GND/ground, green for the parking lines. If the parking lines wire is used (optional), when it goes to 12V+, the system will automatically switch to #2 and display the backup parking lines. This is so you use camera #2 for the backup and #1/3/4 for anything else. Below is a wiring diagram.
Note:It is recommended to consult the specific user manual provided by the manufacturer of your vehicle for going find the power location.
Step 5: Test the System
Before finalizing the installation, it's crucial to test the wired backup camera system to ensure everything is working correctly. Start your RV and engage the reverse gear. The monitor should display a clear and accurate view of the rear of your vehicle. Make any necessary adjustments to the camera or monitor position for optimal visibility. If there are any issues, double-check the connections and consult the user manual for troubleshooting tips.
Step 6: Secure and Conceal the Cables
Once you are satisfied with the functionality of the wired backup camera system, secure and conceal the cables to give your installation a clean and professional look. Use zip ties and electrical tape to bundle and hide the cables along the interior of your RV. This will prevent any potential damage and keep your vehicle looking neat.
By following these steps, you can easily install a wired backup camera system on your vehicle. Enjoy the added safety and convenience of improved visibility while maneuvering your vehicle. Happy travels!